Guide · Heavy Bags
How to Use a Speed Bag
The speed bag is the most frustrating piece of equipment in a home gym for about two weeks, and then it clicks. Almost all of the frustration comes from two fixable things: a platform set at the wrong height, and trying to hit the bag rather than letting it come back to you. Here is the height, the rhythm, and a five-session route from flailing to a steady roll.
Written by Mike M. · Owner, Iron Mako Media
Published
Bag & Bell is reader-supported. Product links go through our affiliate resolver and we may earn a commission from qualifying purchases at no cost to you. Prices are the retailer's, come from Amazon's own product data on the date shown, and change — the button always opens the live listing.
Part of the Heavy Bags hub.
How to use a speed bag · 7 steps
Step 01
Set the platform height first
The bottom of the bag should sit level with your mouth or chin when you stand square to it. Too high and you will be reaching and your shoulders will burn out in a minute; too low and you will be hunching and the rebound angle goes wrong. Almost every beginner has it set too high.
Step 02
Stand square and close
Face the bag, feet level, close enough that your forearm is roughly horizontal when your fist is at the bag. Hands up at face height with the elbows out. This is not a boxing stance — you want both hands equally able to reach.
Step 03
Learn the three beats
After you strike it, the bag hits the board away from you, comes back and hits the board on your side, goes away again and hits the board a third time — and that third beat is where your next strike lands. Count it out loud: one, two, three, hit. The rhythm is the whole skill.
Step 04
Strike with the side of the fist, not the knuckles
Use the little-finger edge of a loose fist, or the flat front of the fist in a small circular motion. Do not punch it. You want a firm tap that keeps the bag moving, not force that knocks it out of its arc.
Step 05
Start with one hand only
Twenty or thirty strikes with your lead hand until the three-beat rhythm is automatic, then the same with the rear hand. Do not alternate hands until each one can hold a rhythm on its own. Most people fail by alternating too early.
Step 06
Add the second hand with the same rhythm
Once each hand can roll alone, alternate one strike each on the same three-beat count. The circular motion of the fists — both rotating forwards — is what makes it look effortless and keeps the timing even.
Step 07
Build time, not speed
Work in one-minute efforts, then two, then a full three-minute round. Speed comes from the bag and the rhythm, not from hitting harder. A round of unbroken rolling at a moderate pace is the goal.
What a speed bag is actually for
Not punching power, and not really speed in the way the name suggests. A speed bag trains three things: keeping your hands up at head height for a sustained period, timing a moving target, and shoulder endurance. Three minutes on a speed bag is a genuine shoulder workout, and the rhythm element is the closest thing in a home gym to the concentration demand of hitting a moving opponent.
What it does not do is teach you to punch. The motion has almost nothing in common with a straight right. If your training time is limited, the heavy bag is the first purchase and the speed bag is the second — we argue that case in punching bag vs speed bag.
Height is the setting that decides everything
If you take one thing from this page, take this: the bottom of the bag should be level with your mouth or chin when you stand square to the platform. Set it there before your first session and most of the difficulty disappears.
Too high is the universal beginner error, usually because the platform was installed to suit the wall rather than the person. With the bag above eye level your elbows sit up near your ears, your shoulders burn out inside a minute, and the bag rebounds down at you rather than horizontally — so the rhythm is uneven and you cannot find the beat. Too low and you hunch forward, the rebound is flat and slow, and the bag drifts.
If your platform is a fixed board with no adjustment, this is the thing to fix. An adjustable platform or a mount with a height track is worth more to a beginner than a better bag.
The rhythm, explained properly
Almost every explanation of the speed bag says "hit it in rhythm" and stops there. Here is what is actually happening between your strikes.
You strike the bag. It swings away from you and hits the board on the far side — beat one. It rebounds back towards you and hits the board on your side — beat two. It swings away again and hits the board a third time — beat three. Your next strike lands immediately after that third beat, as the bag is coming back towards you. Three board strikes, then your hand. One, two, three, hit.
That is the single-hand rhythm and it is the entire foundation. When you alternate hands later, the count does not change: each hand simply takes every other turn on the same three-beat pattern. The reason beginners hear chaos is that they are hitting on beat two, or on beat one, inconsistently — the bag is not actually random.
| Problem | Cause | Fix |
|---|---|---|
| Bag flies off at an angle | Striking with the knuckles, too hard | Use the little-finger edge of a loose fist; tap, do not punch |
| Shoulders burn out in 60 seconds | Platform too high | Lower it so the bag's base is at mouth height |
| Cannot find any rhythm | Hitting on the wrong beat | Count the three board strikes out loud for a full minute before striking at all |
| Bag loses momentum and dies | Hitting too softly or too late | Strike just after the third beat, firmly, with the fist already moving |
| One hand works, two hands do not | Alternating before each hand is solid | Go back to single-hand rounds for two more sessions |
| Wrists ache afterwards | Punching rather than tapping, or a locked wrist | Loosen the fist and keep the motion small and circular |
Do you need gloves or wraps?
Bare hands are normal on a speed bag, and most people train that way. The contact is light and the surface is smooth leather or PVC, so there is no impact to protect against. What you can get is skin wear on the side of the hand from repetition, which is why some people wear light speed bag gloves or simply wrap the hands.
If your hands are already sore from heavy bag work, do not add speed bag sessions on top in the same week — the issue is usually the heavy bag side of your training. Our knuckle and wrist pain page works through why.
Your first five sessions
- Session one. Set the height. Strike the bag once and watch it. Count the three board beats out loud without hitting again. Do that twenty times until you can hear the pattern.
- Session two. Lead hand only, one minute at a time, three efforts. Expect to lose the rhythm constantly. Reset and continue.
- Session three. Rear hand only, same structure. The weak hand always feels worse; it catches up quickly.
- Session four. Alternate hands, thirty seconds at a time. Stop the moment it falls apart rather than flailing through it.
- Session five. A full three-minute round, alternating, at whatever pace holds together. Speed is the last thing to arrive, not the first.
Two weeks of this and the bag stops being an obstacle. Put a timer on the wall so the rounds are real rounds — our round timer roundup covers that, and timer settings for beginners has the round and rest lengths.
Platform noise, and the neighbours
A speed bag is loud in a way the drumming sound does not prepare you for, because the noise travels through the board into whatever the board is bolted to. Mounted on a shared wall it is genuinely antisocial. In a garage on an exterior wall or a freestanding stand it is fine. If you are in an apartment, this is the piece to skip — our apartment page covers what works instead.
Speed bag or double end bag?
They look like they do the same job and they do not. The speed bag is rhythm, shoulder endurance and hand speed on a fixed arc. A double end bag moves unpredictably in three dimensions and trains timing, accuracy and head movement against something that comes back at you. If you can only have one and you want fight-relevant skill, most beginners get more from the double end bag — we lay the two out side by side in speed bag vs double end bag.
Picks
What you need to practise on
A platform at the right height matters more than the bag. A complete kit if you are starting from nothing, a standalone bag if you already have a board, and an adjustable platform if your current one is fixed at the wrong height.
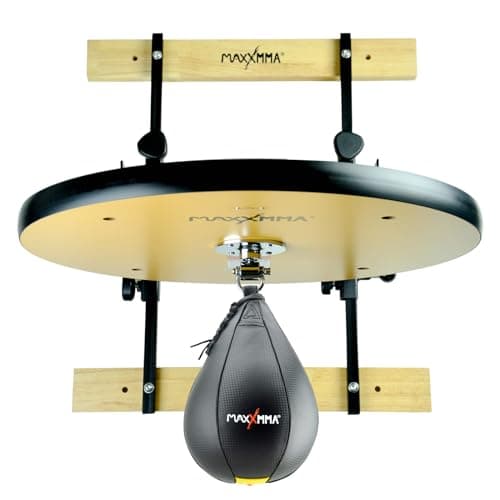
Key specs
- Includes
- 24 in platform, adjustable mount, 10 × 7 in speed ball
- Board
- 24 in diameter
- Mount
- Heavy-duty, height adjustable
Scores · editorial, out of 10
- Rebound consistency
- 7
- Platform / swivel included
- 10
- Size options
- 5
- Shell & bladder durability
- 7
- Value
- 9
Pick 01 · Speed bags & platforms
MaxxMMA Adjustable Speed Bag Platform Kit (24 in)
MaxxMMA
Board, mount and a 10 × 7 in speed ball in one box, with a published 24 in board and height adjustment — the only speed bag purchase that cannot leave you short a part.
Best for
A first speed bag at home, where the platform is the hard part to get right
Pros
- The parts that must match — board, mount, bag — arrive matched
- Board diameter and bag size are both published (24 in board, 10 × 7 in ball), which most kits leave out
- Height adjusts, so the same board suits a 5 ft 4 in and a 6 ft 2 in user
- A 10 × 7 in ball is a large, slow, forgiving rebound — the right size to learn the rhythm on
Cons
- MaxxMMA publishes no swivel type, so plan on upgrading the swivel if you use it daily
- Still needs a solid stud wall to bolt to
- Costs more than buying a bag alone, which is wasted money if you already own a board
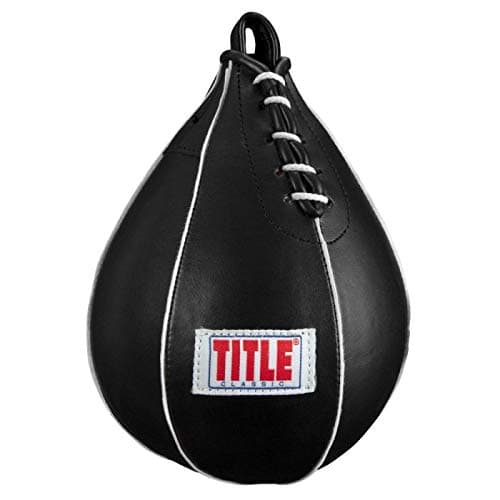
Key specs
- Sizes
- 5 × 8 in · 6 × 9 in
- Sold as
- Bag only
- Line
- TITLE Classic
Scores · editorial, out of 10
- Rebound consistency
- 8
- Platform / swivel included
- 2
- Size options
- 6
- Shell & bladder durability
- 7
- Value
- 10
Pick 02 · Speed bags & platforms
TITLE Boxing Classic Speed Bag (5×8 / 6×9 in)
TITLE Boxing
The cheapest TITLE speed bag, in the two sizes a beginner should actually be using — the bag you buy when you already own the board.
Best for
A first standalone speed bag, or a spare
Pros
- TITLE publishes the actual inch measurements for both sizes, which most listings do not
- 5 × 8 and 6 × 9 are the two sizes that suit a beginner learning the rhythm
- Cheapest bag on this page by a wide margin — cheap enough to keep a spare
Cons
- TITLE publishes no shell or bladder material for this listing
- Bag only, no swivel or platform
- Only two sizes
Specs from TITLE Boxing — Classic Speed Bag; Amazon listing (sizes in stock; checked 2026-10-03).
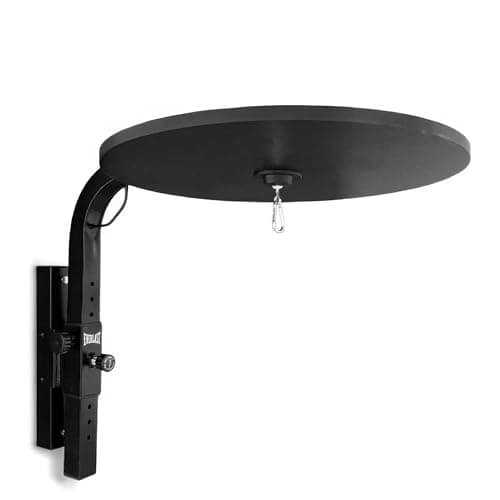
Key specs
- Type
- Wall-mounted, adjustable height
- Bag
- Not included
- Use
- Home gym or studio
Scores · editorial, out of 10
- Rebound consistency
- 6
- Platform / swivel included
- 6
- Size options
- 5
- Shell & bladder durability
- 6
- Value
- 8
Pick 03 · Speed bags & platforms
Everlast Adjustable Speed Bag Platform
Everlast
A height-adjustable wall platform on its own — the part to buy when you already have a bag and swivel you like.
Best for
Upgrading a platform without replacing a bag you are happy with
Pros
- Height adjustable, so it can suit more than one person in the house
- Cheaper than buying a complete set you only half need
Cons
- Everlast publishes no board diameter, thickness, adjustment range or hardware list
- Bag and swivel are not included
- With no published specs you cannot compare it to a wood board on paper
Specs from Everlast — Adjustable Speed Punching Bag Platform (type, exclusions).
FAQ
Frequently asked questions
How do you use a speed bag for beginners?
Set the bottom of the bag level with your mouth, stand square and close, and learn the rhythm: the bag hits the board three times between your strikes. Use one hand only until that rhythm is automatic, then alternate.
What is the rhythm of a speed bag?
Three board strikes between each of your hits. The bag hits the board away from you, back towards you, then away again — and your next strike lands just after that third beat.
How high should a speed bag be?
The bottom of the bag should sit at mouth or chin height when you stand square to the platform. Setting it too high is the single most common reason beginners cannot find a rhythm and burn their shoulders out.
Do you hit a speed bag with your knuckles?
No. Use the little-finger edge of a loose fist, or the flat front of the fist in a small circular motion. Punching it with the knuckles sends it off its arc and makes the rhythm impossible.
How long does it take to learn the speed bag?
Most people can hold a basic single-hand rhythm within two or three short sessions and alternate hands for a full round inside two weeks, provided the platform height is right and they do not try to alternate too early.
What size speed bag should a beginner get?
A larger one. A 9 × 7 or 10 × 7 bag moves slower and gives a wider target, which makes the rhythm far easier to find. Smaller bags are faster and less forgiving — move down once you can hold a round.
Next in your kit
Best boxing round timer →Keep reading
Related guides
- Best speed bags for home →
Kits, bags and platforms, with sizes.
- Speed bag vs double end bag →
Which one trains what, if you can only buy one.
- Punching bag vs speed bag →
Which to buy first for a home setup.
- Round timer settings for beginners →
Turning practice into real rounds.
Sources
- —Amazon listing — MaxxMMA Adjustable Speed Bag Platform Kit (board size, mount, ball) · amazon.com
- —TITLE Boxing — Classic Speed Bag (sizes) · titleboxing.com
- —Everlast — Adjustable Speed Bag Platform (type, adjustment, contents) · everlast.com